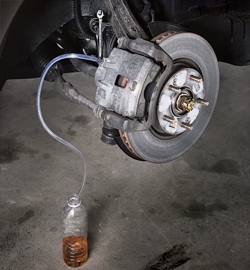
You can buy all kinds of gadgets for pressurized bleeding, but all you really need is some clear tubing and a bottle or two of fresh brake fluid. These instructions are for vehicles that use glycol based (DOT 3, 4 and 5.1) brake fluid and do not have ABS, see your Owner's Manual for your vehicle's specifications.
Here's how I bleed brakes when a really complete bleed is required.
Brake bleeding is always a hot topic, so if you disagree with anything here or want to share your own method, post your comment below
- Adjust your drum brakes before doing this procedure, if your vehicle has them. Consult your owner's manual or service manual for details. Typically, you turn the square adjuster on the back of the dust shield until the brake shoes make contact with the drum, then back the adjuster off a certain amount of "clicks".
- Now is probably a good time to check all calipers, cylinders, hard lines, and hoses for cracks, pitting, abrasion, and other signs of wear. If anything needs to be replaced, you might as well do it now, before bleeding the brake system. Don't take chances with your life and the lives of others - always keep your braking system in top condition. Remember, brake hoses can look fine from the outside, but be deteriorating on the inside or expanding when pressure is applied. Replace them at the intervals specified in your manual.
- Go around and gently tap on everything brake related, to jar any bubbles loose.
- Make sure all of the bleeder screws will loosen okay and that there is a visible amount of fluid released from each when you loosen them slightly. If not, remove those that are clogged and clear the bleed hole with a piece of wire or small drill bit.
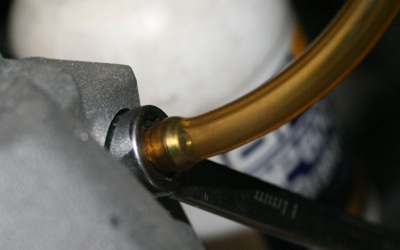
- Use the method of bleeding where you press a medium length of clear plastic tubing onto the bleed nipple and put the other end under the surface of a small amount of brake fluid in an old bottle. Pump the brake, nice slow full strokes, until there are no visible bubbles coming through the tubing. Don't run the master cylinder dry; keep it at least half full. Having a helper for this step is very useful.
- It's worthwhile to do this for all four wheels, then tap everything again: calipers, drum backing plates, lines, junctions, switch housing, master cylinder, etc.
Assuming that by this time there is nothing in the system but new, clean fluid (don't do this next step unless the fluid is clean), I then run a looooong piece of the tubing from each bleed nipple in turn into the master cylinder reservoir. Be very careful not to get any brake fluid on your car's paint. Then, continually pump the brake pedal and watch the plastic tubing for particulate contaminants. If any contaminants or discoloration appears, I take the end of the tube out of the reservoir and direct the contaminant into a waste fluid bottle.
Since there is no necessity to keep the master cylinder (MC) reservoir full with this method, you can really circulate the fluid; the bubbles will float to the top of the reservoir and therefore be removed from the circuit. Once there are no more tiny bubbles in the line (wow, sounds like a song title there), close off the bleeder screw.
Once all four wheels have been done, I apply pressure onto the brake pedal using a piece of wood as a prop or something similar, and then leave it overnight. Dispose of any waste fluid in an environmentally appropriate manner.
So far, this method has always worked for me! — Rocky
Additional Notes
- You can make a one-way valve for the end of your tubing very easily with a plastic sandwich bag. Just attach it to the end of the hose with a rubber band, and cut the tip of a corner off. When fluid tries to go back up the hose, the bag will collapse and cut off the return path. Change your "valve" often as the material will degrade from contact with the fluid.
- Put the box (closed) end of your wrench on the bleed valve before pushing on the tubing, so you can easily turn the flow on and off.
- You will need around 13 feet of tubing to reach from the furthest bleed nipple back to the MC.
- You can get clear tubing at most "big box" hardware stores. Aquarium supply stores will also have it.
- Never re-use old brake fluid or brake fluid from a bottle that has been left open. DOT 3, 4 and 5.1 (glycol based) fluids are all hygroscopic, meaning they will absorb water out of the air, reducing braking performance (by lowering the boiling point of the fluid)
- Glycol fluids (DOT 3, 4 and 5.1) must be completely drained and replaced every 18 to 24 months regardless of how much you drive your car.
- Glycol fluids (DOT 3, 4 and 5.1) will damage your car's paint if they are spilled or if you have a leak.
- Silicone based brake fluid contains more dissolved air, which takes more time to bleed properly, and may give your brake pedal a slightly "spongy" feeling. On the other hand, silicone does not absorb moisture or damage your paint. Glycol and silicone brake fluid should not be mixed.
Want to know more? Click here for a long article about brake fluid at MossMotors.com
Original article by Rocky Frisco, additional notes and editing by Skye Nott


Want to leave a comment or ask the owner a question?
Sign in or register a new account — it's free